We used little wooden peg dolls that we found at Michaels for the game pieces.
Several years ago for Christmas, we bought the girls a small collection of blank books and puzzles from
Bare Books. We also bought a blank game board with a spinner and a set of cards. We FINALLY decided it was time to make our first game.
First I showed the girls the game board, and we started talking about what kind of game they would like to play. We talked about which games we already have and how those games are played. They really like Candy Land (and candy...) so they wanted something with a path. They kicked around ideas including unicorns, candy, Little Red Riding Hood, and unicorns dressed up like little red riding hood looking for candy. Looking for a theme that had a story line they were both familiar with and that wasn't overly complex, we opted to make a Little Red Riding Hood game.
Getting Started:
Once we got our theme in mind, we started by deciding how the players would move through the game. They both like spinners more than dice, so we used the blank spinner that we got with the game board. It was divided into six sections four sections strictly for movement (go forward 1,2,3, or 4 spaces), one penalty type section (the wolf), and the bonus section (cookies and muffins). The girls also enjoy Chutes and Ladders (ok they like the ladder part better than the chute part) so they wanted to include "wolf paths" so that little red could cut through the forest and get to Grandma's house faster. To add an extra educational aspect to the game, we made the blank cards into "wolf cards". The wolf cards feature simple math problems, spelling, story completion (What big eyes you have the better to ________ you with"), and a handful of lose a turn cards. When the player spins a wolf, they have to answer a wolf card. If they get the answer correct, they get to move one space if not they lose a turn. Also, if the player lands on the space that leads to the wolf path, they can draw a wolf card. If they answer correctly, they get to cross the path. If the cookie/muffin section of the spinner is spun, the player gets to advance to the next cookie or muffin space on the board.
Planning out the game ahead of time will make a big difference in how it ends up.
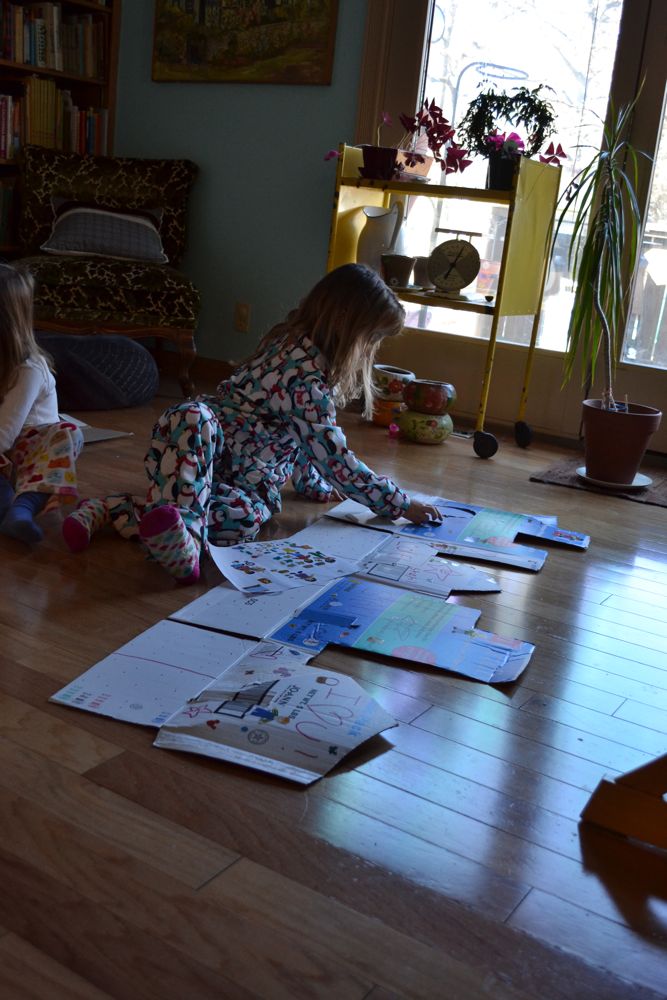
 You can see some of our preliminary plans on the drawings next to the game.
Get to Work:
My girls are six and three (almost four), so I needed to give them simple tasks that would make them feel like they were really contributing to the game. Sylvia (my six year old) is very artistic, so after I drew in the basic path, her job was to draw grandma's house and all of the background decorations. (She chose to make it Grandpa's house, apparently grandma was at the grocery store...) Beatrice helped me decorate the wolf cards and drew little red's house at the start. Sylvia also worked on the spinner. We used markers and watercolors to color in the game board. Both girls are pretty good at painting, so all three of us painted in the background of the board using watercolors.
The final missing piece were the player pieces. Of course the girls wanted them to look like Little Red Riding Hood, so we took a break and went to Michael's to find some blank peg dolls. I cut little red pieces of fabric for hoods and to distinguish players we used different colors of yarn to tie the hoods. I drew the faces with a sharpie.
While at Michael's we also purchased a gift box large enough to hold the game. I taped paper dividers inside the box to hold the parts, and the girls beautified the outside.
 This is a 9.5" x 12" gift box that I taped paper dividers into to house our game. We also considered a shallow plastic bin, but I am cheap, and the 69¢ box won.
  Working on the game board. Sylvia is finishing up Grandpa's House, Bea is finishing up Little Red's House.
 My little game elf hard at work.
 After TWO HOURS of solid work (I can't believe they stayed with me the WHOLE time!) the game is ready to play!
The whole process took us over two hours to complete. Sylvia was completely on board the entire time, while Beatrice took a snack break and a drawing break. This project (or a similar one) would be a great activity for kids 6-10. There are a few things I would change about the game, for example, there are not enough penalty spots and there is no way for a player to move backwards, so it is pretty easy to play. As a parent, I like that the game can end pretty fast, but the kids would probably get a good lesson from having to move backwards. Overall, I am happy with the game. The girls definitely love it, since we play it at least once a day...