Tuesday, March 29, 2011

Handmade Pretties in Pottery Barn


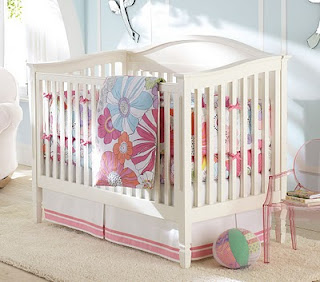
This photo belongs to Pottery Barn Copyright 2011, Williams-Sonoma, Inc. All Rights Reserved.
The ball in this photo is made by
Handmade Pretties.


You might open up the latest Pottery Barn catalog and notice a pink and green sweater ball next to the crib in the photo of the Wildflowers bedding set. Yes. It is a Handmade Pretties ball. I think I still have bits of those sweaters in the bin ready to be sewn!

Good news! I offer sweater balls in a rainbow of colors. You can either choose your color palette to match your decor (doesn't the ball look GREAT in the photo!) or order one of my very popular rainbow sweater balls. These balls can also be personalized and make a really great gift.

I also offer sweater balls in a fun mini size.

Wednesday, March 23, 2011

Do It Yourself: Cardboard City!


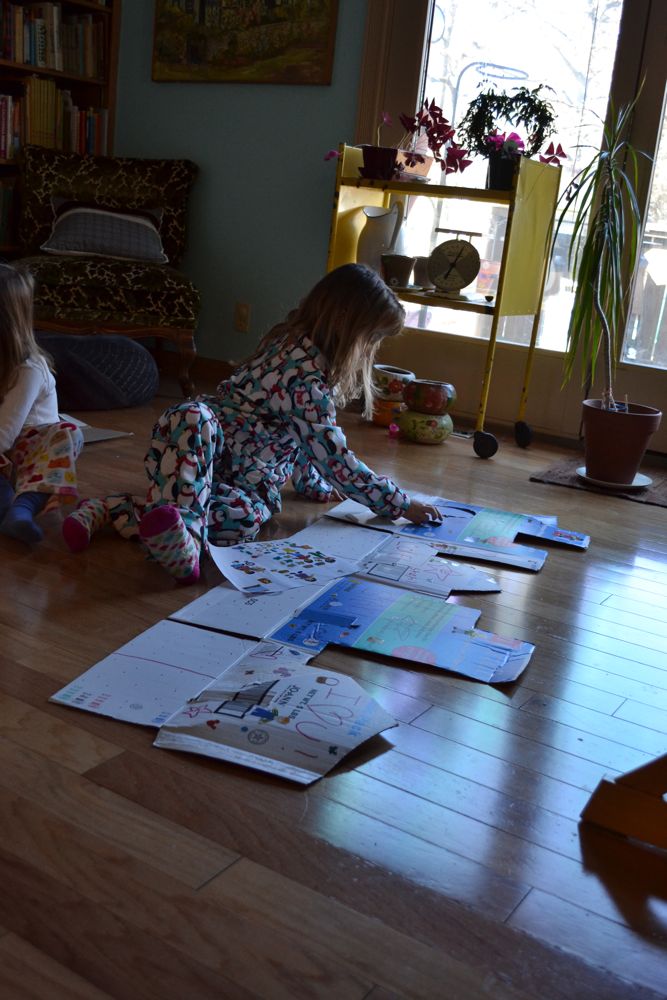
Beatrice playing with the finished product. They also had fun making a circle to keep out tornadoes (yes, they are true midwestern girls).

How many times have you heard "Mom! When are we going to do something fun?" I hear this about ten times a day (ironically it is often on the way home from the zoo or some other epic adventure.) Over Spring Break, our wallets demanded that we find some fun stuff to do at home. So we created cardboard city scapes.

Handmade Pretties uses a lot of 5 pound stuffing boxes, so we chose these as our starting box. Any large box will work.

The first step is to open up the box. Open the flaps on the top and the bottom, then carefully break the seam along the side of the box.

Next, draw your city scape on the main portion of the box (you will be cutting off the top flaps and using the bottom flaps as the supports to make the city stand). Using scissors or a serrated knife, cut out your city. I prefer the serrated knife, since it can be used like a saw, but I have been known to cut deeply into my finger tips while doing this, so be very careful.

Now, draw some doors that sit right along the crease between the main body of the box and the bottom flaps (this way the doors will be at ground level). When you cut out the doors, be sure to leave one side attached if you want the door to open and close.


Beatrice carefully choosing her stickers.

The final step is to give the city scape to your children to decorate. My kids used markers and stickers, but crayons, stamps, paint, and/or glitter glue can also be used.


Sylvia putting on the finishing touches.

Once the kids are done decorating, set up your city and play! The city scapes are a fun addition to blocks and cars, and can be easily folded flat to store. Once the kids are done with them, don't forget to recycle the cardboard!

Monday, March 07, 2011

Do It Yourself: Little Red Riding Hood Game


We used little wooden peg dolls that we found at Michaels for the game pieces.

Several years ago for Christmas, we bought the girls a small collection of blank books and puzzles from Bare Books. We also bought a blank game board with a spinner and a set of cards. We FINALLY decided it was time to make our first game.

First I showed the girls the game board, and we started talking about what kind of game they would like to play. We talked about which games we already have and how those games are played. They really like Candy Land (and candy...) so they wanted something with a path. They kicked around ideas including unicorns, candy, Little Red Riding Hood, and unicorns dressed up like little red riding hood looking for candy. Looking for a theme that had a story line they were both familiar with and that wasn't overly complex, we opted to make a Little Red Riding Hood game.

Getting Started:
Once we got our theme in mind, we started by deciding how the players would move through the game. They both like spinners more than dice, so we used the blank spinner that we got with the game board. It was divided into six sections four sections strictly for movement (go forward 1,2,3, or 4 spaces), one penalty type section (the wolf), and the bonus section (cookies and muffins). The girls also enjoy Chutes and Ladders (ok they like the ladder part better than the chute part) so they wanted to include "wolf paths" so that little red could cut through the forest and get to Grandma's house faster. To add an extra educational aspect to the game, we made the blank cards into "wolf cards". The wolf cards feature simple math problems, spelling, story completion (What big eyes you have the better to ________ you with"), and a handful of lose a turn cards. When the player spins a wolf, they have to answer a wolf card. If they get the answer correct, they get to move one space if not they lose a turn. Also, if the player lands on the space that leads to the wolf path, they can draw a wolf card. If they answer correctly, they get to cross the path. If the cookie/muffin section of the spinner is spun, the player gets to advance to the next cookie or muffin space on the board.

Planning out the game ahead of time will make a big difference in how it ends up.


You can see some of our preliminary plans on the drawings next to the game.

Get to Work:

My girls are six and three (almost four), so I needed to give them simple tasks that would make them feel like they were really contributing to the game. Sylvia (my six year old) is very artistic, so after I drew in the basic path, her job was to draw grandma's house and all of the background decorations. (She chose to make it Grandpa's house, apparently grandma was at the grocery store...) Beatrice helped me decorate the wolf cards and drew little red's house at the start. Sylvia also worked on the spinner. We used markers and watercolors to color in the game board. Both girls are pretty good at painting, so all three of us painted in the background of the board using watercolors.

The final missing piece were the player pieces. Of course the girls wanted them to look like Little Red Riding Hood, so we took a break and went to Michael's to find some blank peg dolls. I cut little red pieces of fabric for hoods and to distinguish players we used different colors of yarn to tie the hoods. I drew the faces with a sharpie.

While at Michael's we also purchased a gift box large enough to hold the game. I taped paper dividers inside the box to hold the parts, and the girls beautified the outside.


This is a 9.5" x 12" gift box that I taped paper dividers into to house our game. We also considered a shallow plastic bin, but I am cheap, and the 69¢ box won.


Working on the game board. Sylvia is finishing up Grandpa's House, Bea is finishing up Little Red's House.


My little game elf hard at work.


After TWO HOURS of solid work (I can't believe they stayed with me the WHOLE time!) the game is ready to play!

The whole process took us over two hours to complete. Sylvia was completely on board the entire time, while Beatrice took a snack break and a drawing break. This project (or a similar one) would be a great activity for kids 6-10. There are a few things I would change about the game, for example, there are not enough penalty spots and there is no way for a player to move backwards, so it is pretty easy to play. As a parent, I like that the game can end pretty fast, but the kids would probably get a good lesson from having to move backwards. Overall, I am happy with the game. The girls definitely love it, since we play it at least once a day...

Friday, February 11, 2011

Do It Yourself: Marshmallow and Toothpick Erector Set


Beatrice with our creation.

It's cold. It's really cold, and Beatrice is bored. Really bored. While we could play another round of Tea Party the game, today I decided to try something a little different. We built a structure out of marshmallows and toothpicks.

Here is what you need to try it too:
One bag of mini marshmallows
AT LEAST 2 -250 count boxes of toothpicks (we use the round ones because my kids are used to being around pointy things, but flat would work too)

Start simply by showing your child how to stick the toothpicks into the marshmallows. Explore basic shapes like barbells, wands, triangles, squares, etc. Move on to more complex shapes like cubes etc. Beatrice and I worked together on our structure. We started by building onto our simple shapes as the structure grew, we talked about what shapes were the strongest (triangles) and how to build support to hold up the structure. As one piece sagged, we built others to hold it up. We played for almost 45 minutes.

Beatrice is 3 and a half years old, and she was able to add to the structure and support her own additions. I helped her if she asked and worked on the "groundwork" to make sure she had a good time building. The structure will continually morph as you build. Parts will sag down as you prop up other parts. Pyramidal supports will hold up sagging sections while emphasizing the importance of supporting structures. See the photos for examples.

Building with blocks, legos, tinker toys or even marshmallows and toothpicks teaches very important spatial and mathematical concepts to your child and is rewarding and fun!


Close-Up

The Masterpiece!

Wednesday, January 26, 2011

Do It Yourself: No Sew Arm Warmers A.K.A. Stop Mitten Gap!


Sylvia modeling the finished goods

This one is for all those kids out there with cold wrists!

If you have spent any amount of time playing in the snow, you have probably experienced the chilling shock of snow on bare wrists. As a child, it was my mission in winter to perfect the art of carefully tucking my mittens into my coat sleeves, but one swift move in a snow ball fight would undo all of my hard work. Now that I have my own children, I want to spare them the agony, so I made them a few pairs of fleece arm warmers. They work like a charm.

Yesterday, an old friend of mine suggested I create mittens to sell that are longer so that her own daughter can enjoy hours of fun in the snow. While I haven't had the time to work out the pattern, I have come up with a great solution for all the parents out there who don't have time to sew.

Here is what you will need:

1 pair of children's knee socks - holes in the toes do not matter so feel free to recycle an old pair
1 pair of scissors


1. lay the sock flat, and cut across the foot of the sock and the edge of the heel. Be sure to leave a little fabric so there is a piece to go between the fingers and the thumb to help keep the arm warmer in place.


2. Insert the arm of a child. Beatrice is modeling the proper technique for applying this product.


3. Put the glove on over the arm warmer and then the coat. The arm warmer will help protect your child's wrist, making snow play far more exciting!

This pattern can be used for adults as well! Involve your kids by allowing them to select which sock they will use. Older children (6+) should be able to make the cuts as well. To prevent serious fraying, select a sock that is mostly cotton or wooly, avoid high nylon content (which wouldn't be all that warm anyway). Hand wash when needed.

Thursday, January 13, 2011

Etsy Favorites: What Santa Brought

It is one thing to believe in buying handmade, it is another to actually do so. This year I made it my goal to get at least 75% of our presents handmade. The other 25% were books, a couple of movies, and a few games. My customers are so good to me, I try to spread the love out as much as I can. Here are some of the great items we scored on Etsy this year!


You may see Scott out wearing this fantastic Tshirt. It is from Billyyy.


The girls got a chicken dinner, pumpkin pie, AND witches brew from Mudpie Kids.


This little guy lives on Sylvia's bed now. We bought it from Cuore.


We got one of each for the girls. Purchased from Sweet Bonny.


Stuffed this baby in Scott's stocking. Bought it from Nowvember, home of the amazing rainbow vomiting cat journals.


Buck Yeah poster for the man in my life from Mixed Species. LOVE this shop.


Hers and hers superhero capes from Baby Pop. Now in addition to playing Wild West they can play Wild West plus Superheros.


I bought two of these cuties for my girls from Tokyo Inspired. They arrived gift wrapped in Japanese paper which helped proliferate the whole Santa thing.


Purchased from Timberps for my step-brother. He predicts this will add a whole new level to the "wood" jokes in shop class.


Purchased from Arizona Dreams for Sylvia after being told that she would no longer have bad dreams if only we'd buy her a dreamcatcher. These were the nicest ones we saw on Etsy.

Tuesday, January 11, 2011

I'm Helpful: How to Carry More Than One Coat

I love winter. I really do. Without it, I feel lost in a perpetual time loop. I do not, however, like the crap that goes along with winter, like coats. I can deal with my own coat, but there is nothing more frustrating than being out with a couple of kids who refuse to carry their own coats. I have been tempted to leave the coats where the kids drop them, walk off and say something like "I hope the kid who finds your coat likes it," and "Boy are you going to be cold when we go back outside," but those little turds will just walk away, leaving a perfectly good winter coat to be swept up by the world. So inevitably, I end up carrying three winter coats (as we are beyond the age of the stroller). Not only does this make my arms tired, but it makes me super grouchy.

The other day, we had to kill a few hours at the mall while our brakes were being worked on. The thought of carrying three coats, my purse, and all the other little stupid things the kids hand me was overwhelming. So I devised a way to turn our coats into a sling bag. The integral part of this device is a scarf. I prefer an adult length scarf, but a kid scarf will do in a pinch.


1. starting with the biggest coat, place the coats inside each other (like a russian doll) stuff the sleeves inside one another.


2. Thread the scarf through the sleeves so the ends are sticking out of either sleeve.

3. Zip or button all of the coats.


4. Tie the ends of the scarf together (I like a square knot) to create a strap.


5. Sling the coats over your shoulder and carry on!

Sunday, October 31, 2010

Recipes: Homemade Pumpkin Muffins


It's Halloween! And what would be more suitable than fresh baked pumpkin muffins. I used the flesh of one of the Vif D'Etampes Pumpkins that we grew in our garden this year. Fresh made pumpkin puree lacks the tinny taste of canned pumpkin and allows you to use the flesh of the many wonderful varieties of pumpkins available on the market.

Dry ingredients:
2 cups whole wheat pastry flour
1 tablespoon baking powder
1/2 teaspoon salt
2 teaspoons pumpkin pie spice
1/3 cup flax seeds
1/3 cup pepitas or sunflower seeds (unsalted)

Wet Ingredients:
2 eggs
1 cups milk
1/2 cup (1 stick) melted butter
1 cup pumpkin puree (canned or *fresh made)
2/3 cups packed brown sugar
1 teaspoon vanilla

Preheat oven to 400 degrees and line muffin tins (makes about 18-24 regular sized muffins)

Mix together all of the dry ingredients in a medium sized bowl and set aside. In a medium sided bowl combine all wet ingredients. Combine the wet and dry ingredients until just mixed (do not overmix). Fill muffin tins about 2/3 full and bake for about 16-18 minutes until a knife comes out clean when inserted in the middle. Cool and enjoy with fresh butter.

* Fresh made pumpkin puree
Select a pie pumpkin, vif d'etampes, or long island cheese pumpkin. I prefer the long island cheese pumpkins. These are the pumpkins that are the same color as a butternut squash on the outside and yield a sweet creamy bright orange flesh. Cut in half and scoop out seeds. Place upside down on a baking sheet (be sure to use one with sides as cooking pumpkin WILL release water). Bake for 40-55 minutes at 375 degrees (larger pumpkins take longer than smaller ones). Your pumpkin will be done when the dome collapses. Remove from the oven and allow to cool completely. Carefully remove the flesh from the outer shell. Mash the flesh with a potato ricer (for muffins or breads) or puree (for pies and custards) in a food processor. You will likely have ALOT of pumpkin puree, the excess can be frozen and stored for up to a year. I portion out the frozen puree into 2 cups portions (this is how much puree is called for in my pie recipe).

Thursday, September 23, 2010

In the Studio: Homemade Dust Filter


My super fantastic dust collector.

If you've ever used a serger, you know that it can generate some serious lint. With what I do, the lint can get overwhelming both physically and emotionally. I worry what all those little fibers are doing to my body and our home. My first step to battle the lint was to purchase a canister vac with a hose so I can periodically suck up the lint. This did help, however I knew I could do better.

I often wear a dust mask when I lay out skirts (just moving cut sweaters is linty) and when I sew. I found that traditional dust mask work well, but they tend to irritate my face, so I fashioned a cowboy style dust mask from several layers of fleece. Between this and the constant vacuuming, the air in my studio has improved, but constantly wearing a dust mask makes my work feel like hard work, so I began to look for an alternative.


Here I am sewing with my dust mask and headphones.

I considered buying an expensive air filter but worried that the amount of lint I generate would instantly destroy it. Instead I rigged up my own air filter using a recycled mail box, a small fan, and several layers of high lift quilt batting.

Materials:
small circular fan (mine is about 10" in diameter)
box (I recycled a 12 X 12 X 8 priority mail box, just make sure your fan barely fits inside)
2 scrap pieces of high loft polyester quilt batting the same size as your box
packing tape
box cutter or serrated bread knife
staples
ruler

1. tape the box on one side be sure to tape on the edges for all four flaps.

2. Cut a circle the approximate size of your fan using the knife (i prefer a serrated bread knife b/c it works like a saw) tape the flaps around the circle to secure.

3. on the side of your box cut a rectangular opening on three sides to allow access to your fan to turn on and off. Leave the flap attached to act like a door.


The access door for fan controls.


4. Put the fan inside the box and tape it to the bottom of the box. Pull the cord through one of the corners between the flaps.

4. On the untaped side of the box, cut off the top flap. For the three remaining flaps, measure in 1" and on the inside of the flap using the dull side of the knife (or a pen) score a line to allow easy folding.

5. fold the flaps in and then measure out 1" and cut off the remainder of the flap. fold in the flaps and tape. This will create the channel for your filter to sit.


This shot shows the handle attachment and the filter slot.

6. using 1" scraps of cardboard, staple the two layers of quilt batting to the cardboard on all four sides. I taped the corners of min to be sure they stayed together (the staples do not like to go through two layers of cardboard).


The filter sitting outside of the slot.


7. put your filter in and secure with a few straight pins (if not when you turn on your fan the air pressure will suck the filter inside the box).


This shows the filter being inserted into the slot. I taped the top of the filter and stuck a few straight pins through the cardboard to hold it in place when the fan is on.

8. Using a 3-4" scrap of cardboard, create the handle by folding it in thirds. About 1 " up from both ends of the handle cut through the outside folds and spread out to create feet. Tape the middle section around to make a smooth handle and securely tape the to the top of the box.

I have my filter placed directly behind my serger at tableheight and it seems to do a really great job pulling the dust away from me. I can actually see the dust collecting on the fiberfill. When it gets full, I will try vacuuming it first and if that fails, I'll make a new filter.

Wednesday, September 22, 2010

Songs to Live By: Decemberists - California One /Youth and Beauty Brigade


While moving away from Los Angeles definitely had it's benefits (home ownership, Grandma Louise), there are definitely days I miss it. Growing up, aside from the fact that my Aunt Carol lived there, I could see no reason to even visit California, yet through a twist of fate I ended up at Cal Arts for graduate school in 2001.

We lived there for almost six years. We grew two babies, made friends, ate delicious food, hiked the mountains, sat on beaches, saw a few B list celebrities, but my favorite memory is driving down highway 1 on the fourth of July. The sun set just as the highway hit the beach. There were people camped out on the beach shooting fireworks out over the ocean. Sylvia was sleeping in the backseat and Scott and I quietly took it all in.

There are so many little unexpected things about Los Angeles that I miss. Hazy layers of city stacked against the hills, mountains hugging the edges, full of people from all over the world where a person can eventually find anything they should wish. It's a longing I never thought I'd be capable of feeling for a gigantic monster like Los Angeles.

I fought the urge to romanticize California (truly it is not in my nature to romanticize ANYTHING) yet anytime I hear someone singing about California my heart swells and my sappy side shows. Iowa is where we'll stay, but for some reason, it's these quiet drizzly days (the days I liked the most in Los Angeles) that remind me that we've left.

Wednesday, September 15, 2010

Around Our House: Squash Gone Wild!


ONE days harvest! I am so sick of eating summer squash!

This is the year of the squash! We planted several varieties, but ONE has managed to take over nearly our entire back yard... Zucchino Rampicante Squash.

It IS delicious. It is firmer than regular zucchini, and it is hilarious and slightly pornographic (we like to wear the big ones around our necks while we stroke the swollen bulb at the end for comedic effect).

I was happy to see OTHER neighbors with squash gone wild. I suppose it likes the super wet summer we've had.

Tonight I shall make stuffed squash blossoms. We'll see if we can't stop the reproduction for a few days!


Here is our plant. Taking over the world. Look for it in your neck of the woods any day now...

Monday, August 30, 2010

Around Our House: The Shoulder Incident


The two "bulletholes" on the front. It took three tiny incisions to get the job done.


The "bullethole" on the back.

So many of you may know that in June of 2010 I had shoulder surgery. Most of you probably do not know why, so here goes.

I have hypermobile joints, and I always have (fingers, knees, and shoulders). When I was about 10 I remember jumping into my aunt's swimming pool, finding that something was wrong with my arm, and barely making it to the edge of the pool. I am fairly certain this was the first time my shoulder dislocated (or subluxated). When my shoulder would dislocate, at first I could wiggle it back in joint, but in recent years, reducing (or relocating) the joint required traction. I can remember at least 12 instances of my shoulders dislocating. Here are a few examples of the activities during which dislocation happened:

Swimming (jumping in, and straight swimming)
Skiing
Swinging on a Swing set
Playing air hockey
Sleeping on my belly
Making the bed
Getting up off of the couch
Lobbing the cat (i know i know bad cat mommy)
Stretching

My list of things I wouldn't do kept getting larger and larger. When I was in high school, I actually had a doctor tell me that I was just looking for attention and that if my shoulder had actually dislocated, I would have been in the hospital. In 1998, I learned of a procedure where they would heat shrink the capsular tissues (the sock of tissue that surrounds the joint for stabilization) to create a tighter joint and prevent dislocations. I had this done on both shoulders. As it turns out, this procedure wasn't very successful for most people (a lot of people with recurrent dislocations are athletic) so they no longer do this surgery. For me, it worked pretty well. After the surgeries, I went almost ten years before my next dislocation.

The first of my most recent series of dislocations happened right after Beatrice was born. I was sleeping on an air mattress with a toddler and an infant (right after our move to Iowa before Scott arrived with our furniture) and the damn cat kept walking across us on the bed. I grabbed him and tried to lob him off the bed which caused my left shoulder to come out. It took a lot longer to get back in joint and I was completely freaked out. I took some advil and that was that. About a year and a half later, I was making Sylvia's bed and went to pull myself up and my shoulder went out inferior (down). All of my previous dislocations had been anterior (they went out the front of the joint) which is the most common type of dislocation. Inferior dislocations are rare and mine required traction to get it back in joint (thankfully I have watched a lot of medical dramas on TV, and had the sense to grab the bunk bed and pull down).

After the second time, I started seeing a physical therapist. Fortunately, he had been through the same type of issues, and was very informative about exactly what was going on with my shoulder. After about a month of therapy (with little improvement) i went to see an osteopath (Dr Honkamp). He did x-rays and an MRI and determined, that I had Hill-Sachs defect on the humeral head (which is caused from the soft head of the humerus butting up against bone during the dislocations) and that my caspular tissue was indeed "floppy". I was given the option to either have the surgery or not. On one hand, joints tend to tighten with age. Since I am in my mid 30s, there was a good chance my joints would tighten and this would no longer be a problem. On the other hand, random shoulder dislocations are scary and painful. I opted to wait it out. I decided that if I had another dislocation in a year, I would do the surgery. I lasted 14 months.

My last dislocation was the final straw. When my shoulder would dislocate, it was painful, but the worst result was the three months of painful back spasms and spinal misalignment that would follow. The last dislocation happened while I was stretching (I literally had my arms up over my head and the joint clunked out). I made my appointment with Dr Honkamp that day.

The surgery I had is called a Bankhart Repair. Basically what had happened in my joint was that as my humeral head came out of the socket, it had been pushing the labrum (a disc of cartilage that cups the head of the humerus on the scapula) off of the bone and stretching it out. In addition, the capsule (a cuff of tissue that fits over the entire shoulder joint) was loose (like a pair of socks whose elastic has failed). During the surgery, Dr Honkamp gathered up the loose edge of my labrum and re-sutured it to the scapula. He also added some very stylish pleats to my capsule to make it tighter. It was all done orthoscopically.


This is a before and after of my capsule. To the trained eye, you can see how terribly stretched out it was. For the rest of us, just imagine the blue stitches pulling the big pink center part tighter together.


This the the before and after of my labrum. The photo on the left shows a wispy translucent tissue. That is my labrum all floppy and floating around. The photo on the right shows the stitches reattaching the labrum to my scapula.


This is the backside of my humeral head. The white is cartilage (which should be covering most of the head). The pink is bone. I've had so many dislocations that the cartilage is significantly worn off.

When the surgery was done, I spent a few days in extreme pain. I had a bad reaction to the hydrocodone and had to take an anti-emetic with it to keep from throwing up. I slept a lot (propped up like a princess on ton of pillows). After about two weeks, I was able to function on Darvocet. It took a full month and a half to get down to regular pain meds like Advil and Tylenol. Now, about three months out, I do not need to take anything as the pain is minimal.

I had to wear an immobilizer for a full month (the one the gave me at the surgery center was so hot and ugly I had to make a new one - if you need a pattern to make one for yourself, let me know!) I was not supposed to drive while wearing the immobilizer, but honestly after about two weeks of being driven and being stuck at home with two bored kids, I did some driving. I started physical therapy to regain my range of motion after the first 4 weeks. After 2 months, I started doing a little strengthening. I currently have a good range of motion (I lack a little rotation) and hope to have it strong and normal in the next month or two.

This is a fairly major surgery. They treat the recovery as if the bone has been broken. It is more serious than a rotator cuff surgery. After the surgery, it will take almost six months to get the joint back to "normal". For me the most frustrating part at this point is the weakness of the joint. After a solid two months of atrophy, I find lifting and carrying to be difficult. Most of my pain comes from stress on the joint due to lack of strength. Hopefully this will improve as I continue with physical therapy.

If anyone out there is scheduled for this type of surgery or if you suffer from frequent dislocations, please contact me! I am happy to share my experience.

Monday, July 26, 2010

Songs to LIve By: Cut Copy - Far Away


I love this song. I must admit, it totally freaks me out to hear music I like on television shows, for example when this song showed up in a club scene in the 6th season of Nip/Tuck (yes. I watched Nip/Tuck on Netflix). Having gone to college in the 90s, I was so used to having to struggle, pour through music rags, spend hours at the record store, and attend countless hours of live music to find anything worth listening to. Thank you internet....

Wednesday, June 23, 2010

Around Our House: Bea's 3rd Birthday


Cutting the cake. Note the reuse of our old sea themed shower curtain as a table runner.

Well I am a little late with this post, but for those of you gearing up for your own birthday parties, here's our version of a fun fish party. The girls and I had a great time planning together and working on the decorations and goodie bags. This party was at least four afternoons of crafts and activities.

We started out by making our goodie bags. I found some fun fish stickers, made little packs of gummie worms and swedish fish, and purchased beach balls for all of the kids. We always buy plain paper bags in different colors and have the kids draw on them. It is hard to find printed birthday materials that aren't covered in Disney characters. For the candies, we found clear plastic treat bags and bought bulk packages and divided them up to save some money. I bought the beach balls from Oriental Trading (not a big fan of cheap throw away toys, but the beach balls SHOULD last all summer).

We also bought cheap plain paper plates in fun aquatic colors and had the girls either draw on them or if you kids are too young, have them stick a few theme related stickers on them. We also purchased three rolls of streamers and a package of balloons. I had an old sea themed shower curtain that I cut into table runners and a cover for our fireplace screen. I had also scored a few seaweed like decorations from a garage sale (by the way always look for decorations at thrift stores or garage sales and conversely anything you do not use or can be used again, be sure to try selling at your garage sale or donate to a thrift store).

I like to have a craft for all of the kids to do, so for this party, we made fishing games. Ahead of time, I made the fishing poles. I purchased short (about 12") dowels, twine, and magnets. If you can find magnets with holes, get hose, otherwise the regular ceramic discs are fine.

Do it Yourself Fishing Game:


Craft foam cut into fish shapes with paper clip hooks. Allow the kids to decorate their own with markers and crayons.


Finishing up the poles with hot glue.

12" long dowels about the thickness of a pencil (or wooden chopsticks)
twine
ceramic magnets (with a hole if available)
assorted colors of craft foam
paper clips
hot glue gun and sticks

Cut your twine into 12" long pieces. Tie to one end of the pole and seal it with a small dab of hot glue. If you have magnets with holes, tie them to the other end of the twine. If not, apply a dab of glue to one side of the magnet and stick the twine to the glue allowing yourself enough room to tie the twine around the magnet.

Cut the craft foam into fish shapes including eels, octopuses, starfish, or any other sea creature you can think up. Allow the children to decorate their own fish using markers and stick on shapes. Slip a paperclip over the end of the fish mouth to act as a hook.

This game is fum for all ages, but you should use caution with magnets around small children who might choke on or swallow the magnets (they can come loose from the twine and pose a serious health risk for young children if swallowed).

Day Before the Party

The girls decorated the starfish with sprinkles and I edged them with frosting.

The day before, we baked and decorated our starfish and fish shaped sugar cookies. We also made our gummie worm and peep sushi. If you have ever made real sushi, these are very similar.
Use a rolled out fruit roll-up in place of the seaweed, rice crispie treats as the rice mixture, and gummie worms and peeps for the "meat". Form the sushi rolls while the rice crispie treats are still warm and flexible and thoroughly butter or grease your hands while working.


The candy sushi was a BIG hit. I wish I could claim credit for this one because they are FABULOUS!

Day of the Party

I woke up early and decorated the cake that I had baked the night before. I was going for an aquarium cake. Check with your local library, many have cake pans to loan.


My kids are always grouchy on party day. I can't figure it out.

After squaring away the food, I decorated the house with three rolls of streamers. I made sure to use them all and the effect was really fun.


The food table with streamer skirt.


I put streamers everywhere.


Grandma Louise keeping my very pregnant cousin company. The green seaweed spirals were a garage sale find.

The party was really fun and the girls and I are already planning for the next one...