Showing posts with label handmade pretties. Show all posts

Tuesday, March 27, 2012

FIVE Candy Free Fillers for Plastic Easter Eggs

FIVE things besides candy to fill plastic Easter eggs:


1. Pom pom chicks - We made these one year for our girls, and they STILL play with them years later. Here is how to make them:

Materials:
1 bag large pom poms
1 bag googly eyes
1 bag of feathers
1-2 pieces of orange fun foam
hot glue gun with glue sticks
scissors

Each chick needs a beak and feet cut from the fun foam. Cut small triangles for the beak and larger triangles for the feet. Each chick also needs one pom pom, two eyes, and one feather.

Using the hot glue gun, put a dab of glue on the end of the feather and stick it to the top of the pom pom. Glue the feet on the bottom. Finally, glue on the beak and the eyes. Ta dah! You just made a chicken.


2. coins - pennies, nickles, dimes, even quarters. My kids enjoy putting the money in their piggy banks more than they'd enjoy the candy. They are old enough that they can count the money too.


3. stickers - the beauty of stickers is that they get used up. We buy a few sheets of stickers and cut them into individual stickers to stuff the eggs. Tattoos work great too!


4. Easter jokes or fortunes - Our seven year old is deeply dedicated to the art of joke telling, so this year, we plan to stuff some of the eggs with small slips of paper with Easter themed jokes on them. Click Here to download a sheet of jokes.


5. Flower seeds - We buy a few packs of flowers and divide them into smaller packets (simply fold little pouches from scratch paper and write the names on each pouch). After the hunt is done, encourage your children to plant their seeds in your garden or flower beds, in pots, or go on a walk and spread the seeds in vacant lots and along fence lines (every kid enjoys a little eco-terrorism)! They can enjoy watching their seeds grow all summer long.

Friday, March 09, 2012

Do It Yourself: Vintage Scarf Wine Bottle Wrap


A beautifully wrapped bottle of wine (or vermouth if you are out of wine...)

How many times have you given or received a bottle of wine wrapped in some sort of wine holder that can only be a wine holder. This is a quick project to use a vintage scarf like wrapping paper for your next bottle of wine. Most large vintage scarves will work great, double check by pulling on opposite corners of the scarf to see if it stretches on the bias. If there is a little bit of stretch, the scarf will work great. The best part, there is no cutting or gluing, simply untie the knot and your recipient will also receive a beautiful new scarf.

Thursday, March 01, 2012

Do It Yourself: Paper Easter Eggs


The finished goods can be used as a fun greeting card, or stuffed with money, tattoos, or stickers.

A few years ago, our daughter lost her first tooth on Valentine's Day. Our clever tooth fairy folded her dollar like a heart and made her a tiny little valentine. As luck would have it, her second tooth fell out three days before Easter. She wondered aloud "I wonder if the Tooth Fairy will bring me something for Easter this time?" Wouldn't you know it, in the morning, the Tooth Fairy had created a tiny little egg that held her dollar.

Coming up on Easter again, these little paper eggs are a fun alternative to the cheap plastic eggs we have all come to stuff with candy.


The supplies

What you need:
Scissors
White Glue
Colored Pencils or Markers
4 X 6 Pieces of Cardstock (Index Cards work GREAT!)
Washi Paper Tape (optional)


Decorating the easy way!

If you have Washi Paper Tape, decorating your eggs will be a breeze! Simply lay down layers of tape across your card stock. I am using 4 X 6 index cards, but a similar size piece of cardstock will be fine. If you choose to NOT use the tape, pre-decorate your eggs with markers, colored pencils, or decoupage (let them dry completely before proceeding).


Fold the paper in half and draw or trace an egg shape onto the back with pencil.


Cutting through both halves at once, cut out the egg shape.


On an additional card, trace the egg shape. On the back of one of the decorated eggs, draw a crack.


Hold both eggs together and cut the crack.


Trace the bottom half of the crack on the blank egg shape then carefully draw about 1/4" INSIDE the edge of the outline along the top half of the egg. This is the portion of the card that will be inside the egg, and needs to be smaller along the top edge so it can move freely in and out of the top of the egg.


Decorate the inside piece. I have drawn a chick with an Easter greeting. A vintage Easter drawing pasted to the inside would also be cute.


Cut it out just on the INSIDE of the outlines.


Put a small amount of glue on the back bottom half of the inside piece.


Press one of the bottom halves into the glue and hold firmly.


Along the bottom half of the front, place a thin bead of glue just along the edge of the paper. Leaving most of the bottom front half open will allow for the egg to work as a container. Press the remaining bottom piece into the glue and hold firmly.


On the back of one of the top halves, put a thin bead of glue along the edge. Leaving the center open allows the card to move in and out of the egg.


After the glue has dried...


Assemble your egg! There is probably a right and wrong way to put your egg together, I find holding the top over the bottom to see which way the crack matches up the best makes it easier.


Once the glue has dried, your egg can be used to hold coins, stickers, tattoos, sticks of gum, or in the case of this lucky egg, FIVE DOLLAR BILLS!

Friday, June 17, 2011

Magazine Feature: Do It Yourself Magazine Spring 2011


Title Page for the Story. I created the dyed and starched candy dishes.

I worked with Jessica Thomas on Eye Candy for the Spring 2011 issue of Do It Yourself Magazine. I spent a good month collecting doilies and lace, dying doilies and lace, painting doilies and lace, and finally sewing doilies and lace. I created the stiffened doily dishes using watered down white glue and a final coat of shellac. I used a similar technique to adhere the lace to votives and a large mason jar vase. I also created the five lace and doily embellished pillows on page 83. The teal pillow in the front simply used doilies as stencils for spray paint. The others featured doilies and lace sewn to the surface of the pillow.


A lovely stack of pillows. I designed and produced all five lace and doily pillows.

A shot of the votives and the mason jar vase.

Tuesday, March 29, 2011

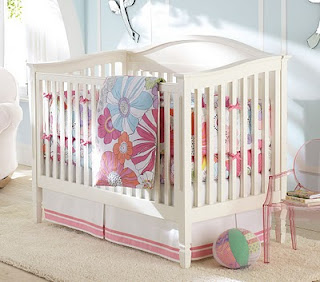
Handmade Pretties in Pottery Barn


This photo belongs to Pottery Barn Copyright 2011, Williams-Sonoma, Inc. All Rights Reserved.
The ball in this photo is made by
Handmade Pretties.


You might open up the latest Pottery Barn catalog and notice a pink and green sweater ball next to the crib in the photo of the Wildflowers bedding set. Yes. It is a Handmade Pretties ball. I think I still have bits of those sweaters in the bin ready to be sewn!

Good news! I offer sweater balls in a rainbow of colors. You can either choose your color palette to match your decor (doesn't the ball look GREAT in the photo!) or order one of my very popular rainbow sweater balls. These balls can also be personalized and make a really great gift.

I also offer sweater balls in a fun mini size.

Thursday, April 01, 2010

New Product: Vintage Tie Gadget/iPod Cases


Dad does NOT want another tie! He WANTS a gadget case MADE from a tie!

I finally found a use for the giant stash of vintage ties I have been saving. These fun little pouches are perfect for cell phones, iPods, and any other device that needs protecting. Each is lined with wool blend felt and closes with a flap.

Wednesday, February 24, 2010

Do It Yourself: Handmade Labels

When I started selling my products on etsy, I ran into a problem. How to label all of my items without spending a ton of money or having to wait for reorders. Originally, I would print out labels on iron transfer ink jet paper and fuse it to felt. These labels worked fairly well. As my business grew, I found that I rarely had time to make more. The print would also tear a little towards the edge of the felt, not to mention my complete lack of ability when it comes to ironing-on. So I began to look into new methods.


Here is an example of one of my early iron-on labels sewn to the bottom of a titty pincushion.

I tried shrinky dinks, mainly because I wanted to MAKE shrinky dinks. This was even MORE labor intensive and convoluted than the iron-on decals, but made for a very unique and charismatic label. I have kept this idea around for some of my more expensive jewelry items.


Here is a shrinky dink label sewn to a fun mushroom pincushion.

Finally, I had the idea to have a stamp made of my logo. I found a company online, Rubber Stamping Across America, that would create an 8" x 10" stamp sheet for a small price. Since there was extra space on the sheet, I designed several fun stamps to use with my work, and had my logo made in two sizes. I had to cut the sheet and attach each stamp to a wooden block, but it was well worth the effort. I recommend paying the couple of extra dollars to get the adhesive backing pre-glued.

When I make labels, I use black "StazOn" brand ink. It claims to not be for use on fabric, but I have washed my labels on clothing repeatedly with only minimal fading. I use different colored scraps from larger projects to print the labels. To cut the labels, I prefer to use my pinking shears. The labels are sewn on by hand or by machine with a tight zigzag stitch.

For my skirts and pants, I have found it to be more efficient to stamp directly on the garment. I purchased a set of number stamps to stamp the size. This saves me the extra step of sewing on the labels after the garment is complete.


The tools for the job.


Stamped labels in action on rainbow sweater balls.

Tuesday, February 16, 2010

Handmade Pretties in the Press: Pregnancy & Newborn - Nov 09

Handmade Pretties has been getting some press lately. Here is a rainbow sweater ball nicely featured in Pregnancy and Newborn.

Here is the feature from the November 2009 issue of Pregnancy and Newborn.